Building SpyCam: Tools and supplies
For this project you will need
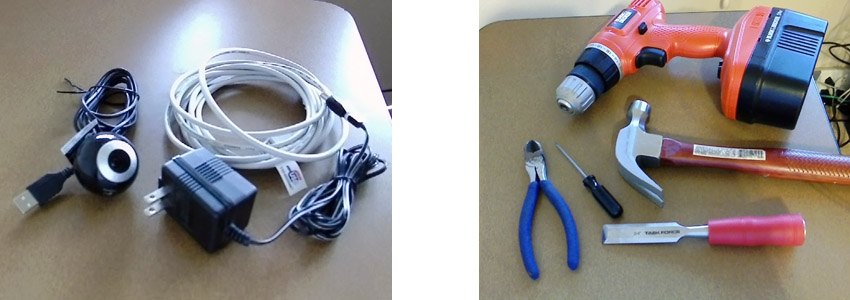
- USB webcam
- Old power supply from cellphone or similar small gadget
- (optional) USB extension cable
- Screwdriver, drill, chisel, hammer, plier.
Taking apart webcam
Webcam case is big and recognizable. Everyone knows that this black sphere with cable is a camera. You will have hard time hiding it. That is why we need to change it’s appearance first.
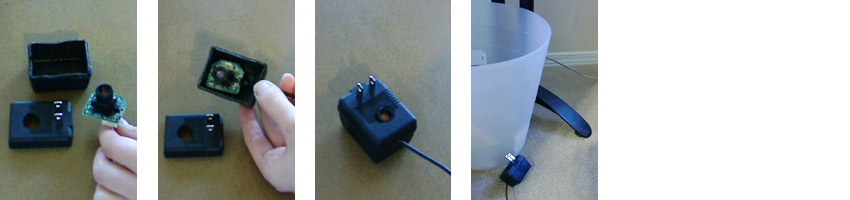
Your goal is to separate circuit board with the lens and a cable from plastic enclosure. At the end cable and lens must be still attached to the circuit board.
I remember when I was a kid I could disassemble any toy in 5 min or less with no tool. All my friends could do this too. I guess this is some kind of the super-power that you loose when you grow up. I hope Malcolm Gladwell will explain this phenomena in his next book. But for now we will have to use a screwdriver.
All Logitech web cameras that I looked at use screws. This is a good thing. Screws are easy to take out. I also saw some cheap cameras that used glue. In this case you will need to brake the case. Use your imagination and utility knife. Put on protective glasses and gloves. You never know when this utility knife is going to snap.

All web cams that I took apart had screw-on lens with a 12mm thread mount. This a standard mount for CCTV lens from home security cameras. There are many stores selling replacements and custom lenses in this size. I would recommend that you build a spy camera with as wide angle lens as possible. So if you decide that you need a wider angle lens for your spy camera or better zoom just search for “12 mm lens mount” in Google. Here are couple examples Store 1, Store 2
Taking apart power supply
Now we need a new “secret” case for a camera. It should be something that is big enough to hold a camera and look natural with a cable attached to it. Here are few options
- Desk lamp
- Alarm clock
- PC Speaker
- Corded mouse
- Power supply or cellphone charger
- Alarm clock
- PC Speaker
- Corded mouse
- Power supply or cellphone charger
I like power supply idea the most. There are always plenty of them around the house. I have the whole drawer dedicated to old chargers. Finally it is time to put them into good use.
Most likely you will need a chisel and a hammer to open it. Be careful. Also remember – when you took apart web camera you needed insides and did not care about braking plastic case. Now with power supply it is the opposite – you do not care about the cord or the insides – but minimize damage to the case.
In my charger the flat metal pins that you plug into the wall outlet were attached directly to transformer. I wanted to keep them – so charger still looks a “real” charger. I took metal pins off with pliers and super glued them back to the plastic case.

Assembling spy camera
Fitting all the components together is fun. It is like playing 3D Tetris, but you can actually win. You need to figure out how to position circuit board and where should you drill a hole for the lens. When you build a spy camera you want it to look “natural”, without huge lens sticking out of the case. That is why you may want to drill a small hole first (about 5-8 mm) and see if it gives you a good view angle. If it does not – then you can always make hole bigger.
Use scotch tape and tiny drops of super glue to hold the parts together during testing.
Advanced: If you remove IR filter from your webcam you can completely cover the lens hole with IR film like this one and make lens 100% invisible for the human eye. Of course you spy cam will record IR only (which means everything will be black and white and weird looking). I did not do this. Maybe next time.
Congratulations, you built a spy camera! Connect USB end of the webcam to a 15 foot USB extension cable and you can set up your spy camera about 20 foot away from computer.
Testing and spying
Plugin your new spy camera to computer and make sure that it works. I used Logitech webcam for this project, so I just launched Logitech QuickCam and checked that I can see myself.
Position the camera on floor, next to the wall or table leg – your “power supply” will look natural there.
We are going to use ugolog.com as a motion activated spy system. It runs in the browser, so you do not need to download any software. Go to www.ugolog.com, create new account and click on RECORD. In a few seconds the monitoring will start. Walk in front the camera – you should see monitoring switching to recording and notifying about recorded snapshots. Walk again and then go to WATCH. You can your static snapshots there right away, but there is a little delay (10-15 min) before you can see video. I like to watch videos instead of snapshots because it gives me a quick overview of the activity.
For more details check out how to setup Ugolog for beginners.
There are more applications that turn your web cam into spy camera. If you are on Linux – you have to check outZoneMinder. But you will be happy with anything from the “best picks” section.
No comments:
Post a Comment